Tile Adhesives Standard
What is a Standard?
A standard is a document that provides requirements, specifications, guidelines or characteristics that can be used consistently to ensure that materials, products, processes and services are fit for their purpose. – International Standards Organization, ISO
Standards allow technology to work seamlessly and establish trust so that markets can operate smoothly. They:
- provide a common language to measure and evaluate performance,
- make interoperability of components made by different companies possible, and
- protect consumers by ensuring safety, durability, and market equity.
In the world of building and construction, ISO standards help codify international best practice and technical requirements to ensure buildings and other structures (known as civil engineering works) are safe and fit for purpose.
The importance of design standards in construction
We need a way to verify their adequacy before they’re built – and that’s the primary role of design standards, making sure that essential requirements for safety, serviceability, robustness and durability are met.
Purpose and benefit of adhesive standards
Testing is important in all aspects of materials science and engineering and especially so in adhesives. The tests evaluate not only the inherent strength of the adhesive, but also the bonding technique, surface cleanliness, effectiveness of surface treatments, application and coverage of the adhesive, and the curing cycle. Adhesive tests are used for a variety of reasons including: comparison of properties (tensile, shear, flexural, impact and durability, fatigue, environmental resistance, conductivity, etc.), quality checks for a batch of adhesives to determine whether the adhesives are still up to standard, checking the effectiveness of surface and other preparation, and determination of parameters useful in predicting performance (cure conditions, drying conditions, bond-line thickness, etc.). The important tests are based on factors including pure tensile strength, pure shear stress, impact tests, etc.
Indian Standard
Adhesives for Use with Ceramic, Mosaic and Stone Tiles – Specification
This Indian Standard (First Revision) was adopted by the Bureau of Indian Standards, after the draft finalized by the Flooring, Wall Finishing and Roofing Sectional Committee had been approved by the Civil Engineering Division Council.
This standard was first published in 2004. This revision incorporates the experience gained with the use of this standard and brings it in line with the latest developments in this field. The following are the significant modifications incorporated in this revision:
a) Title of the standard has been modified to ‘Adhesives for use with ceramic, mosaic and stone tiles – Specification’ from ‘Adhesives for use with ceramic tiles and mosaics – Specification’.
b) Adhesives have been classified into five types namely, Type 1, Type 2, Type 3, Type 4 and Type 5.
c) Measurement of adhesion strengths have been modified to load per unit area.
d) Measurement of adhesion strengths are now to be done using UTM.
e) Requirements such as slip and deformation of adhesives have been added.
f) Requirements such as rheology and storage stability have been done away with.
This standard also specifies the procedure for the tests to evaluate the properties of different types of tile adhesives suitable for fixing tiles of different porosity on various substrates.
The suitability of a tile adhesive largely depends on the following factors of tiles to be fixed: (a) The porosity/density; (b) Size of tile; (c) The nature, surface and location of the substrate; and (d) The area of application, interior or exterior submerged conditions or wet areas.
This standard prescribes the requirements for adhesives used for fixing tiles of different porosity and classifies the tile adhesive into different types suitable for their proposed application. This standard covers adhesives for installation of ceramic (vitrified and non-vitrified), porcelain, clay, glass, glass mosaic, metal, natural stone and engineered stone tiles.
For the purpose of this standard, the following definitions shall apply.
Fine Thin Bed Fixing – A process of tile fixing into a bed of an adhesive average of 2 mm in final bed thickness.
Thin Bed Fixing – A process of tile fixing into a bed of an adhesive average of 6 mm in final bed thickness.
Medium Thick Bed Fixing – A process of tile fixing into a bed of an adhesive not less than average 6 mm and not exceeding average 12 mm in final bed thickness.
Open Time – Maximum time interval after application at which tiles can be embedded in the applied adhesive.
Adjustment Time – Maximum time interval after which tiles positioned in the adhesive layer can be adjusted without significant loss of adhesion.
Shelf Life – Time storage under stated conditions during which an adhesive is expected to maintain its working properties.
Slip – Downward movement of a tile embedded in the combed adhesive layer on vertical surface.
Deformability – Capacity of hardened adhesive to be deformed by stresses between the tile and the fixing surface without damage to the installed surface.
Transverse Deformation – Deflection recorded at the centre when a beam of hardened adhesive is subjected to three-point loading.
CLASSIFICATION
The adhesives shall be classified into 5 types:
Type 1 Adhesive
This adhesive is suitable mainly for tiles with apparent porosity greater than 3 percent. It is suitable for most of the clay and ceramic (non-vitrified) tiles of small dimension (size not more than 300 mm x 300 mm) and the majority of cement-based backgrounds (substrates) like cement plaster, cement concrete, cement screed, etc, and for interior dry area applications only.
Type 2 Adhesive
This adhesive is suitable mainly for tiles with an apparent porosity less than or equal to 3 percent. It is suitable for vitrified/fully vitrified tiles, glass mosaic tiles, all stones, dense and large dimension (More than 300 mm × 300 mm size) tiles and stones (slabs), and where background and location is more demanding like wet areas, submerged areas, etc. This type of adhesive is recommended for both interior floor and wall applications, and for exterior floor applications.
Type 3 Adhesive
This adhesive is suitable mainly for tiles and stone tiles on exterior wall substrates like plaster or concrete. It is suitable for tiles like ceramic, clay tiles, basalt tiles vitrified, glass mosaic tiles and porcelain tiles and all-natural stone tiles.
Type 4 Adhesive
This adhesive is suitable mainly for tiles and stone tiles which are included in Type 1, Type 2 and Type 3 but intended for installation on dry wall board substrates. It is suitable for all types of tiles and stones except metal tiles or engineered stones to be installed on dry wall board substrates like gypsum boards, plywood, wood, calcium silicate boards, medium density fibre boards, fiber cement boards, cement boards, bison panel, etc.
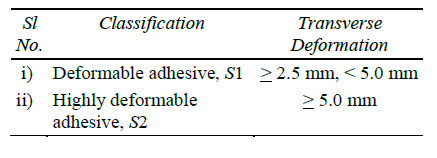
For all tiles/stones of size more than 600 mm × 600 mm, the adhesive shall also comply with ‘S1’ category of transverse deformation. For all tiles/stones of size more than 1 200 mm × 1 200 mm, the adhesive shall also comply with ‘S2’ category of transverse deformation.
Similar results to polymer modified adhesive can be achieved by the addition of a liquid admixture to the standard general-purpose adhesive which is called as polymer fortified adhesive. This is a more of specialist and technical solution that provides enhanced adhesion and increased flexibility. Thus, by addition of liquid admixture to Type 1 adhesive, its properties can be enhanced to meet the performance criteria of Type 2 or Type 3 or Type 4 adhesive.
Type 5 Adhesive
This adhesive is suitable for all types of tiles including engineered stones (manufactured stones) which are intended for installation on glass or metallic substrates like, grid iron, mild steel, stainless steel, aluminum or copper, etc. It is suitable for metal tiles, glass tiles, engineered stones or for all types of tiles and stones to be installed on different cement-based substrates like cement screeds, plaster, concrete, drywall boards like gypsum boards, plywood, wood, metals composite boards, modified backer boards and the metallic substrates.
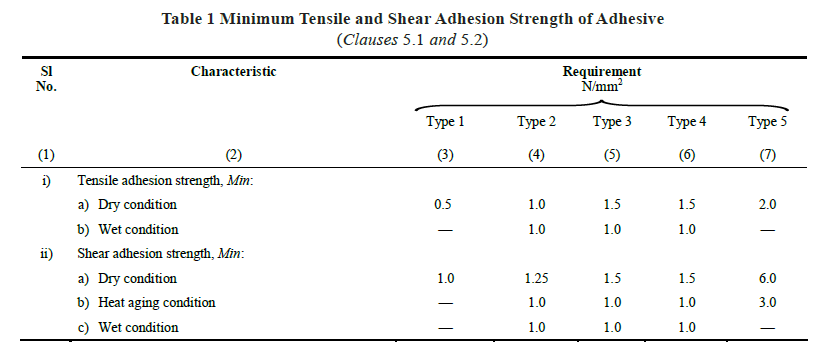
Tensile Adhesion Strength – When tested in accordance with the method given in Annex A, the mean tensile adhesion strength of adhesive shall comply with the requirements given in Table1
Shear Adhesion Strength – When tested in accordance with the method given in Annex B, the mean shear adhesion strength of adhesive shall comply with the requirements given in Table 1.
Open Time – When tested in accordance with the method given in Annex C, the open time shall not be less than that stated by the manufacturer.
Adjustment Time – When tested in accordance with the method given in Annex D, the adjustment time shall not be less than that stated by the manufacturer.
Slip (Required for Vertical Application Only) – When tested in accordance with the method given in Annex E, the slip shall not be more than 0.5 mm. Slip resistant adhesives shall be designated as ‘T’.
Deformability (Required for Vertical Application Only) – When tested in accordance with the method given in Annex F, the deformability shall be within the range mentioned below for a particular class as stated by the manufacturer:
AEIPL Adhesives with standards classification
| Sl no | Tile Adhesives | EN 12004: 2017 | IS 15477: 2019 |
| 1 | T A | – | Type1T |
| 3 | S 15 C | – | – |
| 4 | Bronze Star | – | Type1T |
| 5 | Silver Star | – | Type1T |
| 6 | Silver Star Plus | C1T | Type2T |
| 7 | Gold Star | C1T | Type2T |
| 9 | White Star | C1T | Type2T |
| 10 | Diamond Star Grey | C2TS1 | Type3T |
| 11 | Diamond Star White | C2TS1 | Type3T |
| 12 | Diamond Star Plus Grey | C2TES1 | Type4T |
| 13 | Platinum Star White | C2TES1 | Type4T |
| 14 | Platinum Star Plus Grey | C2TES1 | Type4TS1 |
| 15 | Platinum Star Plus White | C2TES1 | Type4TS1 |
| 16 | Flex Grey | C2ES2 | – |
| 17 | Flex White | C2ES2 | – |
| 18 | ArdiFlex S1 Grey | C2TES1 | Type4TS1 |
| 19 | ArdiFlex S1 White | C2TES1 | Type4TS1 |
| 20 | ArdiFlex S2 | C2TES2 | Type4TS2 |
| 21 | ArdiFlex PU 5 | R2T | Type5TS2 |
ARDEX ENDURA ACADEMY
Our industry, like any other, requires on-going training to keep up with the changes in legislation/standards and materials. Our purpose-built training facility enables us to offer a range of demonstrations and seminars that can be tailored to your specific needs, ensuring total confidence in the specification and subsequent on-site application. The academy allows you to learn about new technologies including ‘Industry best practices for Tiling, Waterproofing, Concrete Repair and Flooring’ along with Technical guidance and product information.
For the latest and most up to date information and advice, visit the ARDEXENDURAacademy centres across India (Bangalore, Mumbai, Ahmedabad, Delhi, etc.,). For Tiling Contractors and applicators committed to providing a high level of workmanship, ARDEX ENDURA helps them to increase both their professionalism and productivity.
For our other TILE & STONE INSTALLATIONS, please visit to www.ardexendura.com
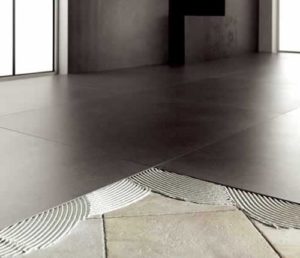
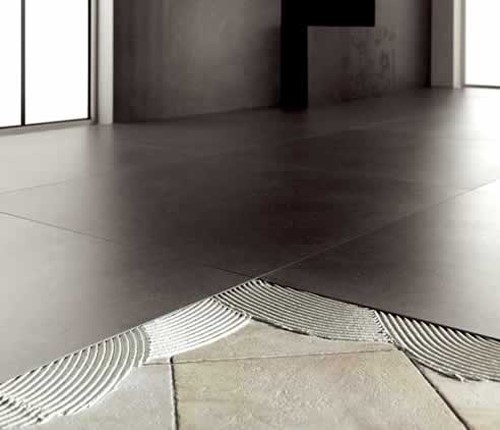
If your floor has begun to show signs of wear or you’ve grown tired of its outdated style, you may wish to have new tiling look.
Tiling over tile is usually a much easier and cheaper solution than pulling up your original tiles and re-tiling your floor or wall. One advantage of doing this is that it eliminates the need for clearing the debris and saves noise pollution and to maintaining the structural stability un-affected. Also, work-hours saved to pull up the existing tiles, which means the tiling work can be finished much faster and open for usage!
Let see the work timeline for the renovation of existing tile just for 10 Sqm only: –
| Removing of existing tiles. | : | 1 day |
| Removing of tile adhesive beds. | : | 1 day |
| Surface cleaning | : | 1 day |
| New tiles fixing | : | 1 day |
| Curing tile adhesive bed | : | 7 day |
| Grouting the joints by tile grout | : | 1 day |
| Curing | : | 7 day |
Hence, the total process of replacement of tiles takes 19 days. Of course, the area of working will not be able to use by others as it causes mess.
The following are few photos taken in site while the process of replacement of tile was undergoing.

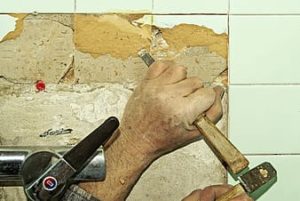

In all the above process, it is just waste of time, not of any use. The removed tiles are not reusable. While removing the tiles by mechanical or manual means, the process damaged the underneath substrate and even structural stability by passing the dynamic load. All the debris got by entire process may be used for just back filling works only. Also, it causes the environment pollution by creating dust, dirt and sound.
Installing tile over tile, however, does have some downsides also. These include the floor height, which can become an issue as it could make the tiled over floor high and possibly block doors. Removing doors and trimming them to the correct height of the newly tiled floor can overcome this concern. Precise measuring will need to be done before applying the tiling over tile method.
Inspection of the existing tiles is very important to make sure that they are adhering well to the substrate. Tiles that adhere well, do not sound hollow when tapped. The best way to check the tiles for ‘hollowness’ is to tap each one with the back of a screwdriver and listen for a hollow sound. If the tiled area is 95% free from hollow sounds, it is good for tiling over. Any localized loose tiles may be removed and the spot.
You are now set to do the retiling work. The following steps are helpful tips when installing tile over tile:
- Clean the existing tiles with detergent and water to remove dirt, sealers and wax. Rinse the surface with clear water and let it dry.
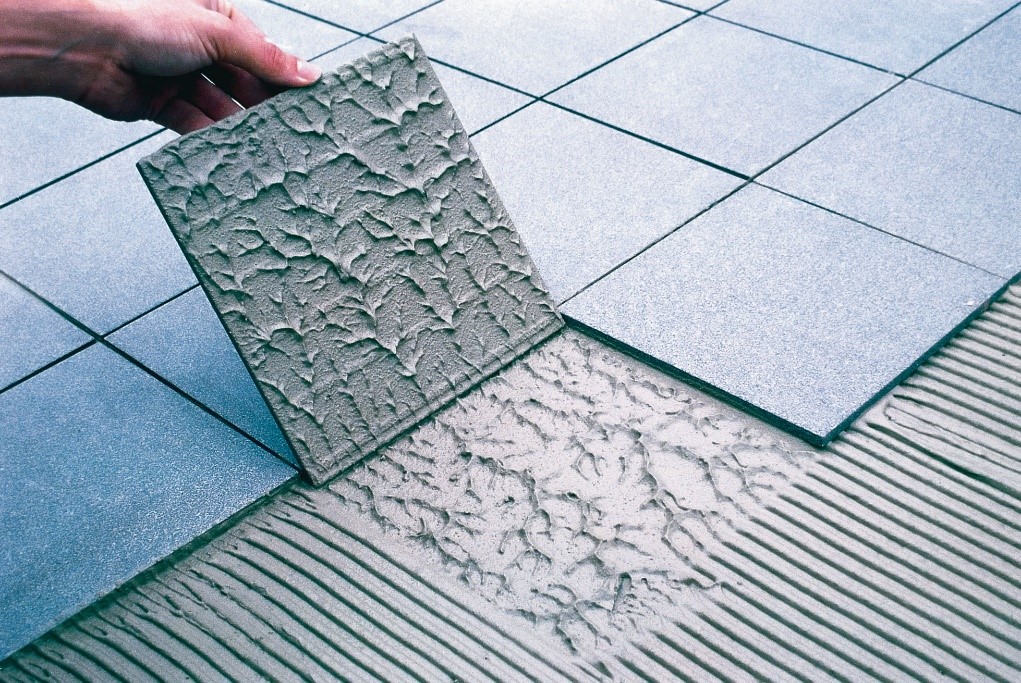
- Mix and apply the thin set adhesive onto the prepared existing tile surface which can be covered within the open time of the adhesive.
- Install new tiles on the adhesive and press it in twisting action to ensure 100% bonding coverage.
- While tiling on a wall, the total weight of minimum 32 kg per square meter must be taken into account. The first layer of tiles and adhesive will be loaded by the second layer, but then both layers will cumulatively load up the substrate.
- Shaded external walls and floors with adequate falls to prevent ponding water are acceptable.
Do not adopt ‘tile-on-tile’ installations in:
- External applications including high facades & walls, cantilevered verandahs or decks, and tiled driveways as these areas can be subject to high stresses and movements.
- Swimming pools and ponds as this is not recommended as a standard practice.
To save time, money, structural stability and to provide the working area quickly to users, ARDEX ENDURA provides, DIAMOND STAR adhesive (CT1 range of EN 12004 requirement) for installation of small size and light weight tiles and ArdiFlex S1 (C2TES1) for the installation of large format tiles on existing tiles.
For more information on ARDEXENDURA products, visit www.ardexendura.com
You May Be Interested In…
Tile Adhesives Standard
June 29, 2021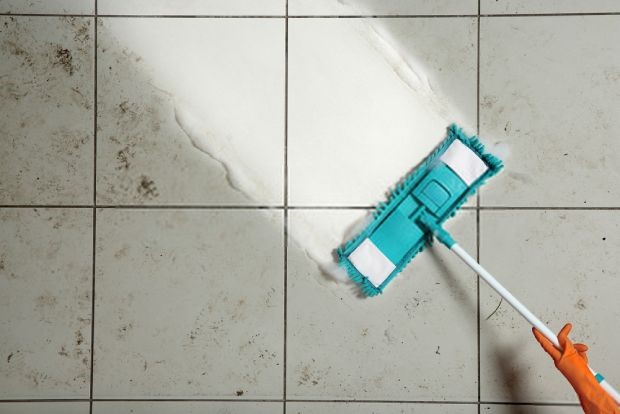
Tile Cleaners
April 1, 2021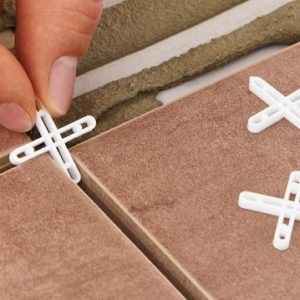
Importance of Joints, Spacers and correct Grouting
August 17, 2020
Natural Stone Sealer For Protection – Concerns & Solution
April 17, 2020
Tile Installation On Existing Tiles
April 17, 2020